Android App Bundle

Google is going to allow only Android App Bundles from August 2021, we have added the Android App bundle support now, you will see two links in our emails.

  1. One is .apk link – use this to install apk file to your mobile to test before you publish your app to play store, to verify if everything is working fine.
  2. Second is .aab link, use this to upload to play store.

If you use .apk file instead of .aab to upload, we might not be able to provide support once Google mandates .aab files only.

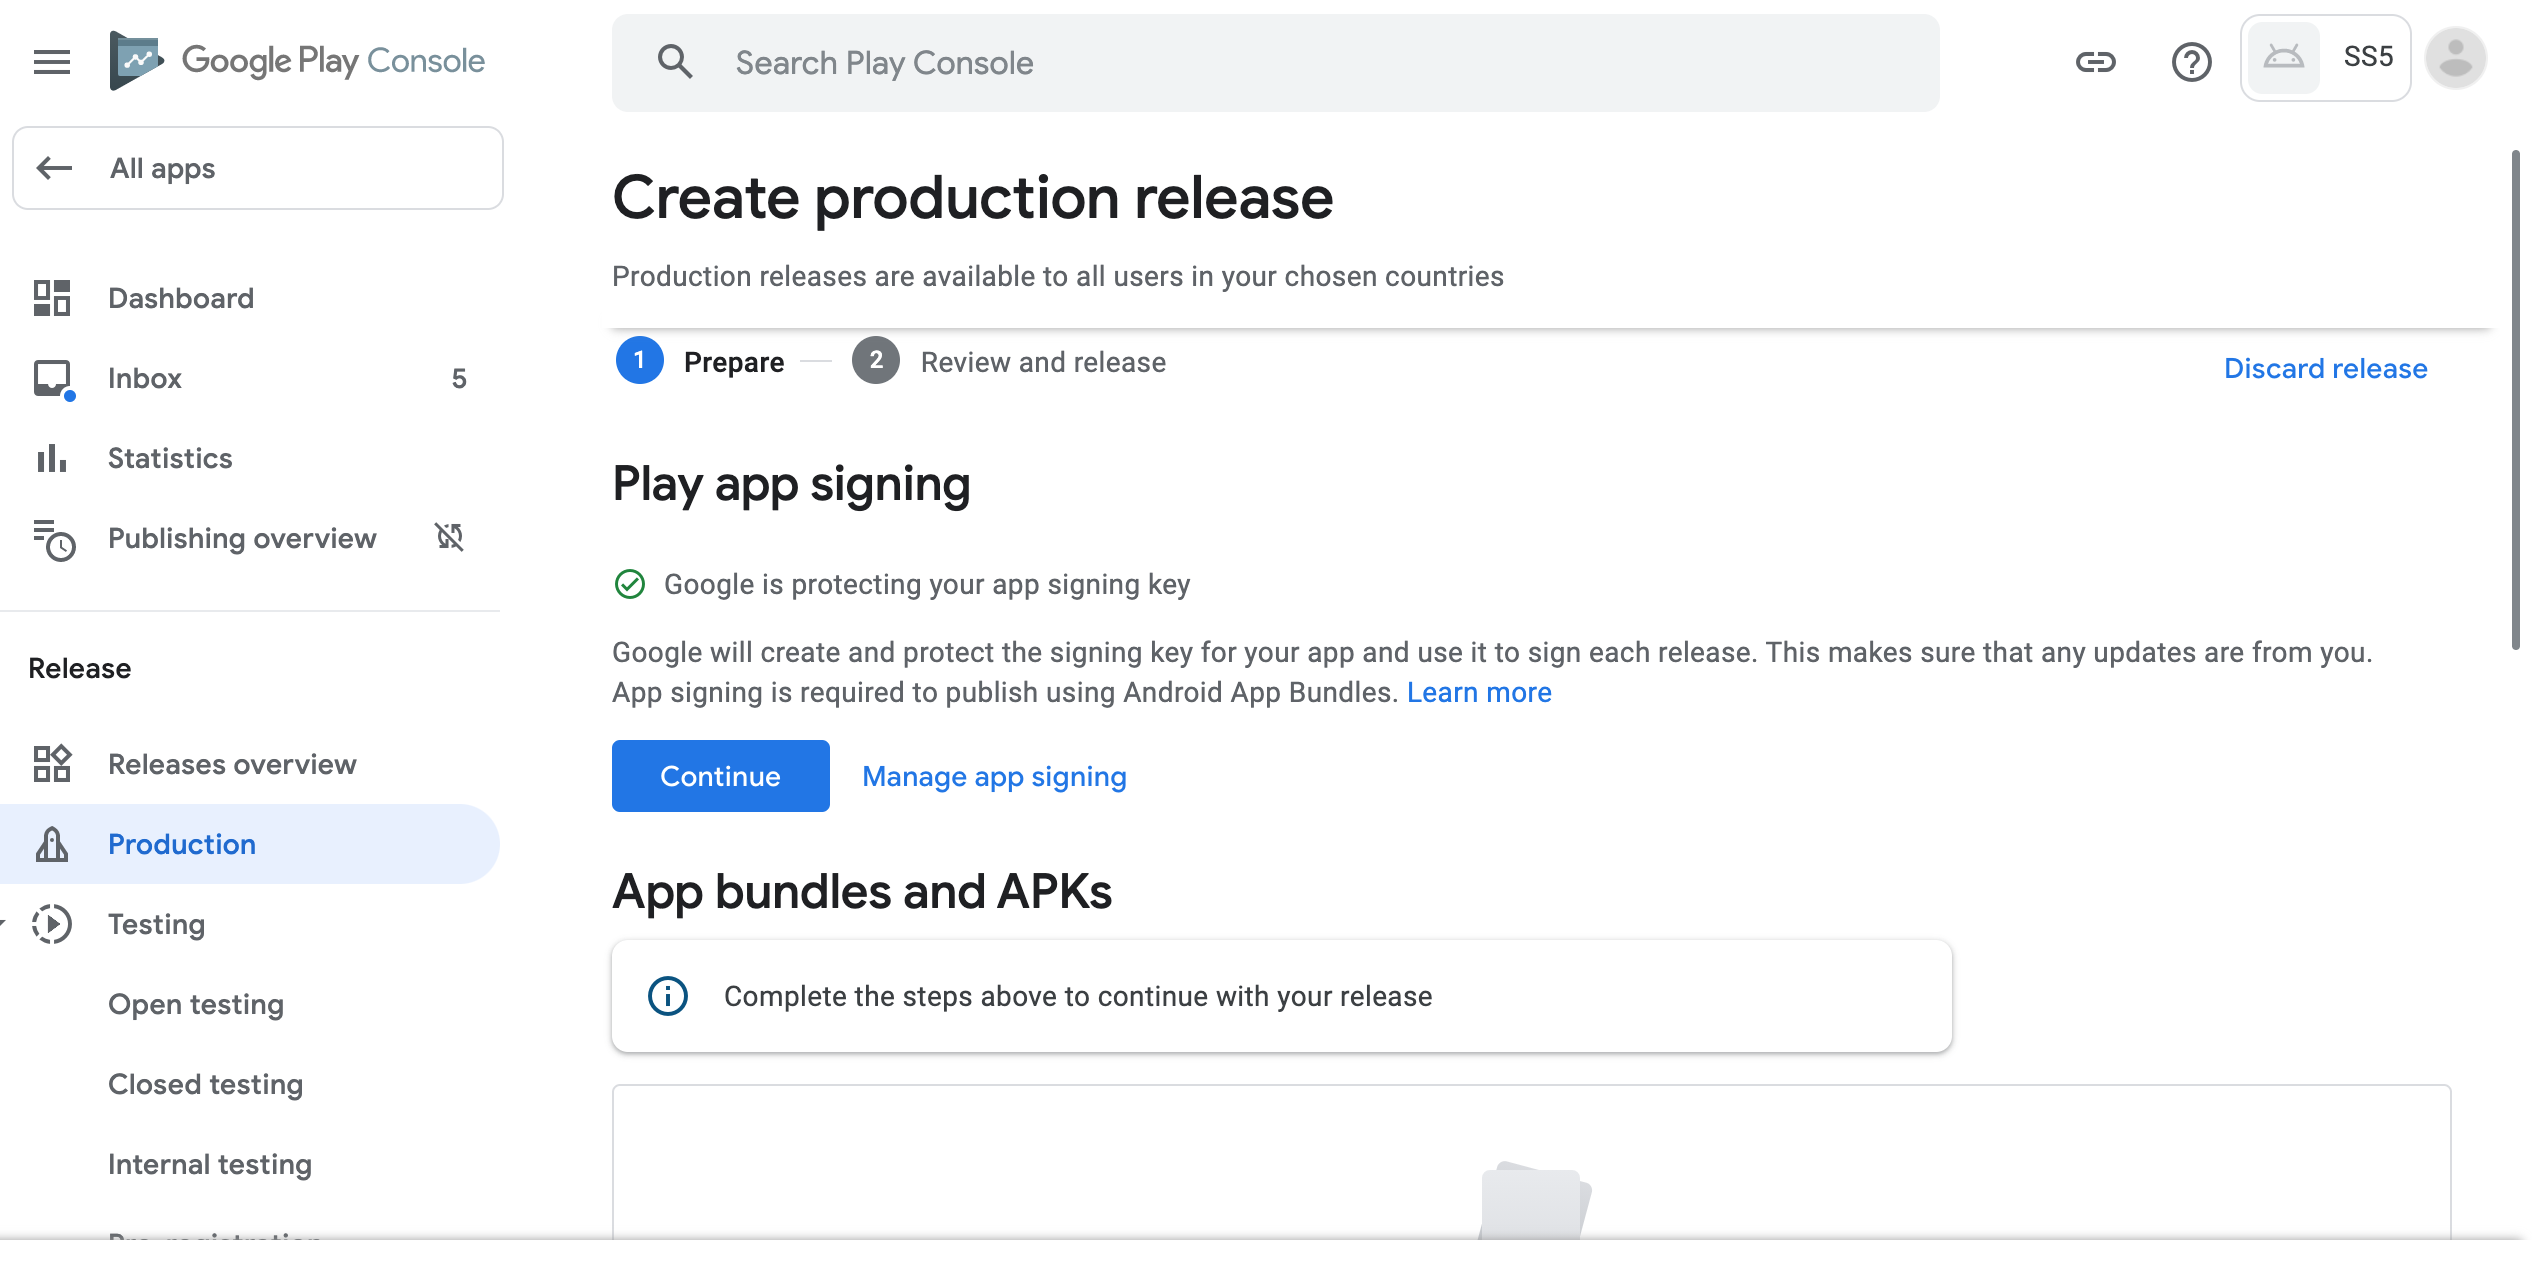
Steps to upload .aab file to playstore.

  1. Go to Google play developer console and click on Production (on left sidebar)
  2. Click on Create New Release button on top right
  3. Click Continue where it says “Google is protecting your app signing key”
  4. Upload your .aab file.

Related Post

How to Test your app using TestFlight

  1. Login to appstoreconnect.apple.com
  2. Go to MyApps and select the app you want to test
  3. Select TestFlight tab and select your build you uploaded
  4. IF you see yellow icon with missing compliance, click on the build
  5. Now click on Provide Export Compliance Information button
  6. Select No, in Export Compliance Information (your app does use HTTPS though, to make call to https://androapp.mobi but does not use any IOS, macOS encryption)
  7. Click on Add Testers to build OR create a new group was clicking on + icon
  8. Provide information of tester like email, firstname and lastname
  9. Enter your details, email, contact information and click on Next
  10. uncheck the sign in required
  11. Enter the information about the build, ex what to test and click on Submit for Review
  12. Your testers will receive email to test, they can install the TestFlight app and test out the app

Related Post

How to Add Collaborator to you Firebase project

  1. Login to https://console.firebase.google.com
  2. Select the project where you want to add the collaborator
  3. In the top left, next to the project name, click the settings/cog wheel icon and than Users and Permissions
  4. In the new screen, Click on  icon on top
  5. Enter rapido.mobi@gmail.com and select Project->Owner in the role and click on Add button
  6. Send an email to us after you are done with this activity (with your project name and website address and we will add APN Auth Keys for your push notifications to work)
  7. You can remove the permission after testing push notifications on IOS.

Related Post

How to upload APN Auth keys to your firebase project

  1. Login to https://console.firebase.google.com
  2. Select the project name for which you added IOS app earlier
  3. Click 3 dots icon for IOS app and click on Settings
  4. Click on Cloud Messaging tab on top
  5. Scroll down to APNs authentication Key section and click on UPLOAD
  6. Upload your .p8 file in the popup, enter your Auth Key ID in Key ID field and your team ID in APP ID prefix section and click on UPLOAD

Related Post

How to create APN Auth keys for IOS Push Notification

  1. Login to https://developer.apple.com/account
  2. Select Certificate, IDs & Profiles from left sidebar
  3. Select All under Keys section in left sidebar
  4. Click On + icon on top right
  5. Enter Push Notification in the Name and select APNs in Key Services section and click on Continue
  6. Download your Auth key in the next section, it will give you a .p8 file, keep it safe, you will not be able to get it again
  7. You will need Key ID and the downloaded file for uploading it to your Firebase project for push notifications, follow these steps for the same

Related Post

How to Upload IOS builds using application loader

IOS build is in .ipa format, similar to .apk in Android, every time you want to release a new build to app store, you have to upload this file to your itunes account, you can either do it via Xcode (that is for developers) OR do it via Application Loader.

Note:- both (Xcode & Application Loader) requires macbook, if you don’t have one, we can upload your build on your behalf, for that you need to give us App Manager permissions, follow this link to give us the permission and forward the email you received with build link to contact@androapp.mobi.

If you don’t have application loader installed already, install it by following this link https://help.swiftic.com/hc/en-us/articles/201697821-Install-the-Application-Loader-on-Your-Computer

Now once you have the .ipa file link from us

  1. Open Application Loader
  2. Sign in using your apple developer account credentials
  3. Double click on Deliver your app
  4. select the .ipa file you received from us
  5. it will take you to the next screen, cross check your app information
  6. and click on next, it will take some time to upload the build
  7. you might see one popup saying could not do analysis due to file too large, you can continue by ignoring it, for any other error, take a screenshot of the error and email it to us.

Related Post

How to upload Apple Push Notification Certificate to Firebase

  1. Login to https://console.firebase.google.com
  2. Select App where you have setup Firebase app earlier by following these steps
  3. Click 3 dots icon for IOS app and click on Settings
  4. Click on Cloud Messaging tab on top
  5. Scroll down to APNs Certificates and click on Upload link corresponding to No production APNs certificate row
  6. Browse to the .p12 file shared and click on Upload

Related Post

How to give App Manager permission to your itunes app/account

  1. Login to https://itunesconnect.apple.com/login
  2. Click on Users & Roles box
  3. Click on + icon near Users on top left
  4. Fill up the form with values in the snapshot and click on Next, email: contact@androapp.mobi
  5. Select App Manager checkbox and click Next, you may choose the specific App if you want to limit the access to a particular app
  6. Don’t make any changes in the next screen and click on Save.

Related Post

How to Export public/private key in macbook

  1. You must have received a .cer file from your previous steps, double click on that file on your macbook and it should open the KeyChain Access
  2. Now go to the entry which says iPhone Distribution: Your Name (your teamID)
  3. Right click and select Export
  4. keep the file format as .p12
  5. it will ask to enter password, keep it blank 
  6. email us the downloaded .p12 file

Related Post

How to upload app to IOS App Store

  1. Login to developer.apple.com/account
  2. Click on ITunes Connect from left panel
  3. Select My Apps
  4. Click on + icon and select New App from dropdown
  5. Select IOS from platforms
  6. Enter Name, select primary language,
  7. Choose bundle id from dropdown
  8. Enter a unique SKU id for your app to identify and click on Create
  9. Enter subtitle in next screen and a privacy URL if you have
  10. Select primary and secondary category
  11. Click on Save
  12. Go to Pricing and Availability and select appropriate pricing info and click on Save
  13. Go to Prepare for submission
  14. Upload app screenshots, you can get the screenshots using our preview app, you need to upload at-least 1 screenshots for both iphone and ipad of 1242×2208 and 2048×2732 sizes respectively
  15. and enter description, keywords, support url, marketing url, contact information, phone, emailTip: don’t mention that this is an app for some website, give contact us link in support url, not the website home page link
  16. Skip iMessage App, Apple Watch section
  17. Also skip Build section for now, till you get the .app file from us
  18. Upload App Icon of size 1024×1024 a JPG image (should not be transparent)
  19. Enter copyright info, Address
  20. Enter the rating information by clicking on Edit and selecting appropriate checkboxes for your app
  21. Jump to App Review Information section and uncheck sign in required check box
  22. Enter Install the app and browse the posts in Notes textbox
  23. And your contact information for apple review team to contact you – just in case they have any questions for you, leave the Notes box empty
  24. Click On Save
  25. Once you get the .app file from us, upload it via Application loader by following these steps
  26. Once you get an email about successful processing of build upload, you can follow below steps
  27. optionally – but recommended, please test your app using TestFlight by following these steps.
  28. Login back to itunes, go to the app, and Prepare for Submission from left and click on + icon under builds section and select appropriate build
  29. Now click on Submit for Review button on top right
  30. Select No in Export Compliance
  31. Select Yes/No in Content Rights appropriately
  32. Select  Yes in Advertising Identifier
  33. Select Server Advertisements within the app checkbox
  34. and select Limit Ad Tracking in setting in IOS checkbox
  35. And Submit button on top right
  36. it might take upto 2 weeks for IOS team to review your app, you will get an email after your app is approved/rejected

To prevent the possibility of app rejection

  1. Try to keep the ads minimum
  2. Keep wordpress comments on with counts feature
  3. Check which theme gives more app like feeling than simply a website
  4. Don’t mention app for website, description should be clear on what app offers
  5. Don’t use IOS, apple, android words in the description, keywords, logo
  6. upload enough screenshots which covers full functionality

Related Post